25 May 2010

Christmas wishes

Two posts in one day wow- but I'll be away for the rest of the week with a friend so thought I'd try to post these today I should be back on Friday sometime.

This card is to play with a couple of challenges - the Justrite Christmas challenge JustRite Friday Challenge 019- Christmas in May & A BIG Announcement! and Sparkle creations Christmas Card Challenge Week #25 - Sentiment Only

  posted 100_3263

Recipe and How I made this card: Base:-Yellow card stock, Focal - White cardstock embossed using the Cuttlebug snow dots embossing folder and various scraps from my stash.- the Red shiny is actually part of a decoration that was being thrown away because it was broken and when I saw it I thought I might be able to use it somewhere -thank goodness I kept it I've used it heaps-It's great to die cut and emboss and if you sand it you get another dimension again. I die cut Nestabilities dies the classic circles and scalloped circles sets -sorry not sure which sizes I used but they fit the JustRite stamps perfectly. Stamps- Just Rite Christmas Treasures  Borders and centres Round 3 1/4 stamps set. I stamped these and embossed using Zing Gold glitter for the border stamp and Red glitter for the sentiment. Just to add a bit of bling I placed an heart over the O in Wonderful. Ribbon: red velvet ribbon I bought at KMart after Christmas- It's not the best for cards as it's a bit thick- I think it was meant for a wreath but at 10cents a roll I wasn't complaining and I think it just adds that extra touch.

If you really wanted to you could remove the focal point and attach the ribbon to it and use it as an ornament or gift tag.

Hope you like this card feel free to leave a comment

Thanks for visiting

Regards

Catch you Later

Kathy S

white,white,white

This card is for the Annabelle stamps blog challenge Say It In...White

I thought I wouldn't be able to do this because I just LOVE colour - it seemed like a real challenge for me but once I got going I had a great time -good enough that I produced two cards.  They were actually pretty quick to make and assemble so I will be making more monochromatic cards I think. Both these cards could be used for many occasions. sorry about the photos- I am a terrible photographer and it was very overcast outside today and really cold so I took these inside.

 image

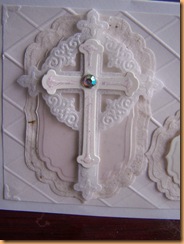
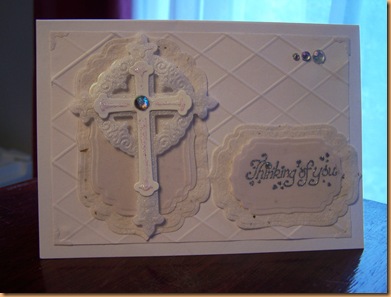
Recipe:Card 1:- Base: White Cardstock , Main Focal handmade paper that actually has plant life through it but most of it fell out once I cut it.- Pendant Nestabilities  - the large section and the two smaller sections - the one that looks like a wreath and the one that looks like a cross -I cut 2 of each of all of these shapes and stacked them. Flower bead- this came in a bag of beads and things I bought at a craft show recently- it was full of really interesting beads and gems I will be using them a lot in the future-sorry can't remember the name of the company I got them from. Ribbon this  is one from my stash it's designed to be gathered because it has a thin thread running along the edges (I had never noticed it before this card so I will try it out at a later date)but I didn't use them I just tied a bow. There is also a sentiment on this card which I stamped in white chalk ink and embossed using white embossing powder- it just says "thinking of you" can't remember where I got this stamp from either sorry.

posted 100_3271 posted 100_3285  This card is really pretty IRL and if you look closely the corners have actually got the little bits left from the die of the large cross centres on them - I thought they were too quaint to just throw away so I thought I'd use them as corners. The gems are sort of multicoloured but not coloured if you can understand that-they seem to reflect and pick up the colours around them. I used the crosses because I think they are so pretty- they are such a great set to own.

Recipe Card 2:- Base-White cardstock; Background paper is actually just copy paper which I scored on an angle to give the diamond shapes then I used my Labels Four Nestabilities 3, 4and 5 - I cut 2 of the 4's -one for under the crosses and one for under the sentiment. Papers used are handmade paper, pearl vellum and various scraps from my stash. I cut the crosses using the Cross collection shapeabilities - I used the largest and the third cross and then embossed both by running through my machine again. I added Kindyglitz to the front of the smaller cross to give it a bit of sparkle.  I layered these together and then mounted them on top of the labels cut outs using dimensional tape. Ink- I stamped the sentiment using versamark watermark ink and embossed using a Zing silver embossing powder and heat set it. These I attached to the card using double sided adhesive. I thought it needed something else so I added 3 gems in the top right corner and one in the centre of the cross and I don't know if you can see it but there is one as the dot on the letter i as well.


I love the way both of these cards turned out and will definitely be trying other cards in the future. Hope you like them both too-

Please feel free to leave a comment or suggestion -thank you for visiting

Regards

Catch you Later

Kathy S

18 May 2010

Puppy this is for you

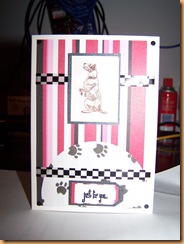
I made  this card on the weekend for one of the teachers at school who lost one of her adorable "family" members last week. She was very sad so I thought this card may help to cheer her up. I got this set of stamps and a cat one about a month ago for this particular reason - most of my friends have either a dog or cat or both and the inevitable is going to happen sooner or later so I thought these would be a great set to own (besides the images were all so darn cute I just fell in love with them).

posted 18052010 100_3245


The layout is actually for "the Diedrich Dare - Whimsical Wednesday" challenge DDSC35! and this is the first chance I've had to post it. It is a great sketch done by one of the DT's children and makes you think outside the box a bit. Hope you visit the DT members and see their amazing creations.

Recipe:-Card size- A6 white base card; Papers-Heidi Grace Love Blossoms Jersey Stripes; Paw prints (sorry can't remember who made this paper it was in a set of animal designs I got from KMart a while ago) the black is just scraps from my stash. Stamps- Just for you-Crafty Bitz,  Dog- Birch Exchangable- Small Dogs set. Ribbon- A touch of class-this was a wide ribbon so I just cut it down to my requirements-it's like a florist ribbon. Rhinestones-Black-Basics by Kaisercraft. Embossing Powder- Judi Kins Black Detail. Ink - Stazon Timber Brown, Versamark Watermark. Colours- Lyra Aqua Color crayons.

Thanks for visiting and hopefully will be able to have more frequent posts soon.

Catch you Later

Kathy S

13 May 2010

Baby


image

This is a card I made a while ago for another challenge but never posted it so thought it was to pretty to not share- I think I'll be giving this one to my daughter because it isn't really pink- she doesn't like pink that much -which is funny because now she has 2 daughters and EVERYONE gives you pink for babies - Big LOL!!!.

This baby picture is one I bought back before my daughter was born -30ish years ago- it was a sort of decoupage picture on a sheet with a heap of other baby and children pictures and I just fell in love with it but never used them all I still have several sheets so I have decided my cards would be the perfect place to use some of them. The papers are some K&Company I bought a few years ago and haven't used in ages- something else I'll be sorry when it runs out- I might just keep some and look at it it's gorgeous.

    image


Here is a closer look at this beautiful little picture and the paper for the background- so pretty


This is for The Shabby Tea Room for their Week #9 - Chipboard Challenge - the "baby" is chipboard and painted purple and then glittered so I thought it fit. Hope you like it I think it is one of my favourite cards at the moment.

Card Recipe  (as best as it can be -I'm not very good at this part of blogging)

Card Base is white card stock-finished size 14cm x 15cm (5 1/2" x 5 3/4") approx.

Papers- K and Company and scraps from my stash

Picture- decoupage picture, OTHER:- chipboard letters -Bella! chipz; Ribbon- creative Corner; Lumiere Paint pearlescent Violet; Glitter; Helmar 450 Glue; lace -stash

I think that's all I used

Thanks for visiting

Catch you Later

Regards

Kathy S

09 May 2010

Welcome little one

This is the second post for today-  and part of the reason I haven't been posting recently as I have been waiting for this news and haven't wanted to start any projects until things settled- as well as several other things happening and me working every day(my body is still not used to that) so I don't know when I'll get another one in but thought I'd let you all know I AM A GRANDMA AGAIN whoooohoo! - no really my grandchildren range from the age of 3 3/4 -he'll be 4 in July, then there is a 2 1/2 year old granddaughter and a 2 1/4 year old grandson and then Olivia who is 18 months then another granddaughter who is nearly 1 then another grandson 5 months old and then Vanessa who is 5 days - all 7 of them. Considering  I have 3 children I don't think that's bad going-although I have told them to stop for a while.

I don't normally post pictures of my family but my daughter has said its ok this time so here is my latest darling granddaughter Vanessa Elizabeth she was due two weeks ago so we were waiting patiently because good things come to those who wait -right?

image

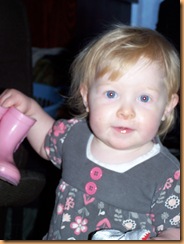
Vanessa was born at 12.16 am on Tuesday morning and weighed 3.150kg. I spent the night looking after her big sister Olivia Kate pictured below who is also the spitting image of her mum when she was this age and just as cheeky- but oh so adorable.

I have also included a picture of the whole happy family image


100_3175


Catch you later

Regards

Kathy s


Just for you


my internet is giving me a hard time so I hope this eventually loads because I've tried three times already and it just drops out

image

This card is the first I've had a chance to make for what seems like ages- well it is really-my poor craft area hasn't seen me for Oh so long and I was starting to get scared it wouldn't see me for longer yet but I snuck down and had a couple hours play time and this is what I created- it's for the "The Shabby Tearoom"  challenge Week #8 - Get Your Bling On - it's finishing today so I thought I'd better get this one posted I hope I'm not too late for it.(then hopefully I'm sneaking back to my room for some more fun for another hour before dinner.) and then who knows when it will see me again.LOL- or cry if you feel like me!

Here's a closer look at the teapot and cups. I used the double sided sticky and lace and glitter technique to do this and am quite happy how it turned out

image

First I die cut the tea pot and cups and saucers out of double sided sticky paper although I didn't use the sticky on the back for this card and then I found some lace that I liked the pattern on and after removing the backing stuck the lace to the shapes then I covered it all in the blue glitter (don't know what colour or where this either of these glitters came from it's been in my stash for years and never seems to run out- thank goodness I love this colour. Then I tapped the excess glitter off and put it away then I removed the lace and covered the rest of the sticky with a white holographic glitter to finish it off. The rest of the things used in this card are Spellbinders Blossom dies 1,2 5 and 6; Martha Stewart Doily heart border punch; some gold powder for the saucers -can't remember who made this one; gold stickers from my stash and all the papers are odds and ends from my stash too as is the blue base card the finished card size is approximately 5 3/4" square  OR 14.5 cm. Not even sure where the stamp came from but I use it heaps- it's a clear acrylic one I probably bought on sale somewhere and the ribbon is from a local discount store.

Hope you have had a good Mothers day wherever you may be!

catch you later

regards

Kathy s